This is an official reference page. If you encounter inaccuracies or would like to expand the page, please message the developers in the #phantom-modding channel on BYG Discord.
This guide assumes you have the Phantom Brigade Mod SDK installed. You can create models and textures in any software of your preference, but you will need the fully imported Unity Project to set up the Prefabs with ItemVisual components mentioned in the last part of this tutorial, and to include the 3D assets you create into a mod. Once you're done setting up assets in Unity, follow the Custom Models tutorial in the Getting Started SDK window to export them into your mod.
Note: Knowledge of 3D modelling software and Unity editor is required for this guide
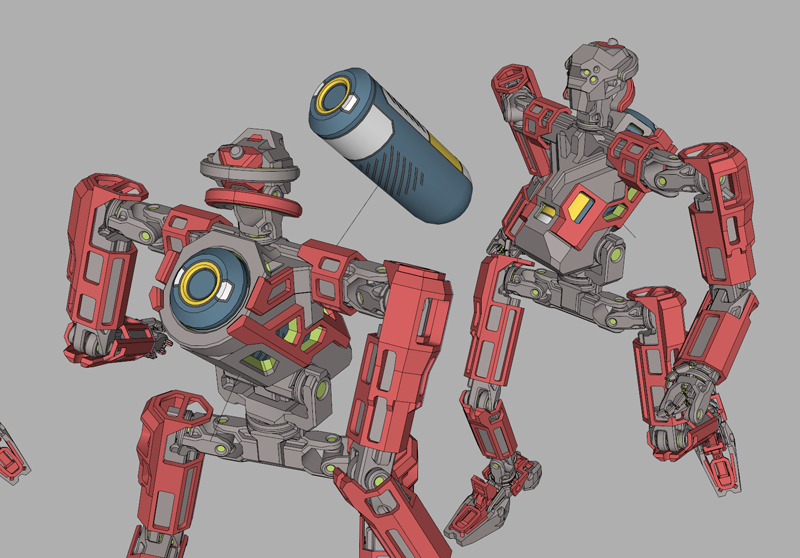
Let's start with understanding what mechs are made of and how they are structured. The foundation of every mech is its mech skeleton - a fragile structure of the mech that houses its internal components and has no protective armor plates.
Mech skeleton itself cannot be customized (i.e. its structural “anatomy” cannot be chaged with new armor parts). At the core of the skeleton is pilot pod - a capsule housing a cockpit with (usually) a human pilot.
Armor is set to reinforce and protect the fragile mech skeleton and it follows the same structure:
¶Color-coded mech skeleton structure and how armor sets are split in the same body parts
There are two kinds of mech armor parts
Armor that mounts on top of mech skeleton
Armor that replaces a part of mech skeleton
¶This armor set only uses mech skeleton to mount its parts on the mech
¶This armor set replaces almost everything in the mech skeleton (Note: certain joints and hands cannot be replaced)
You are free to mix and match these two approaches within one armor set as well.
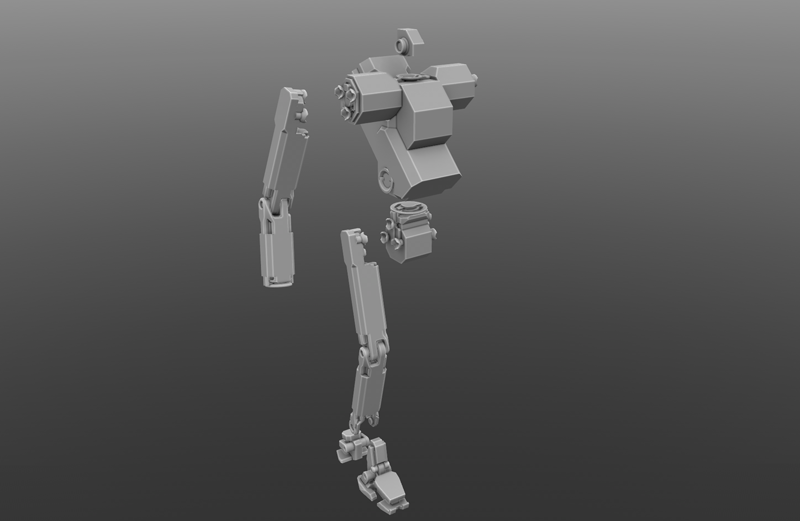
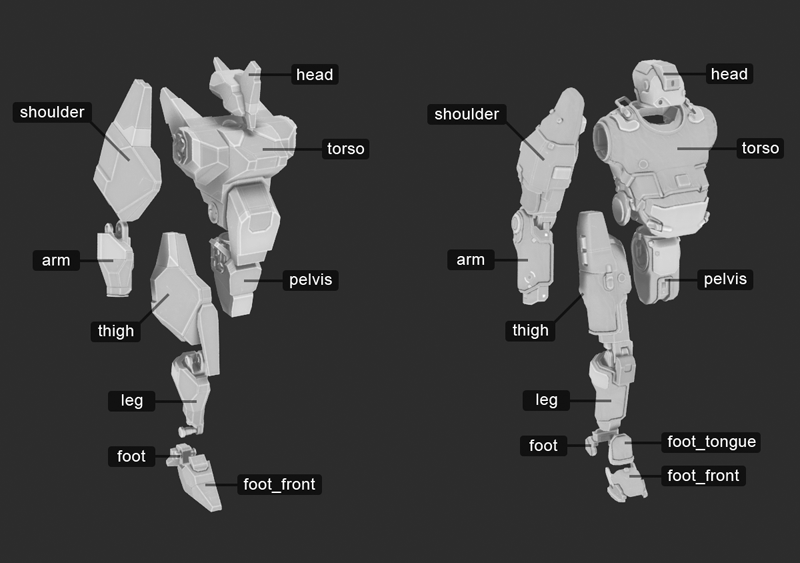
Replacing a part of mech skeleton with self-contained armor part allows you to have more freedom in how your armor is shaped, because this way you are not restricted by the underlying skeleton shape. You only need to keep connecting joints in place.
¶Notice how Hakobu's leg has a very different structure from Helge leg, because it replaces the whole leg part
Note: Armor parts should always be split per body part they are intended to be attached to. The game does not allow making a combined shoulder+arm part, for example, they will need to be split.
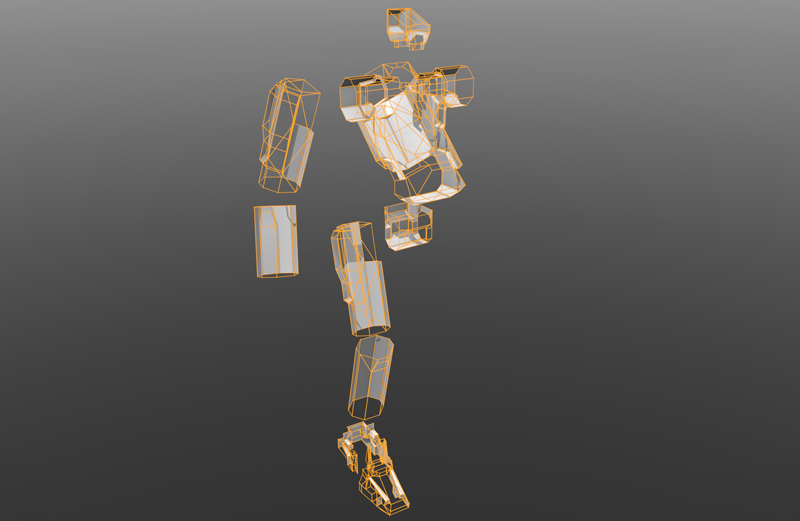
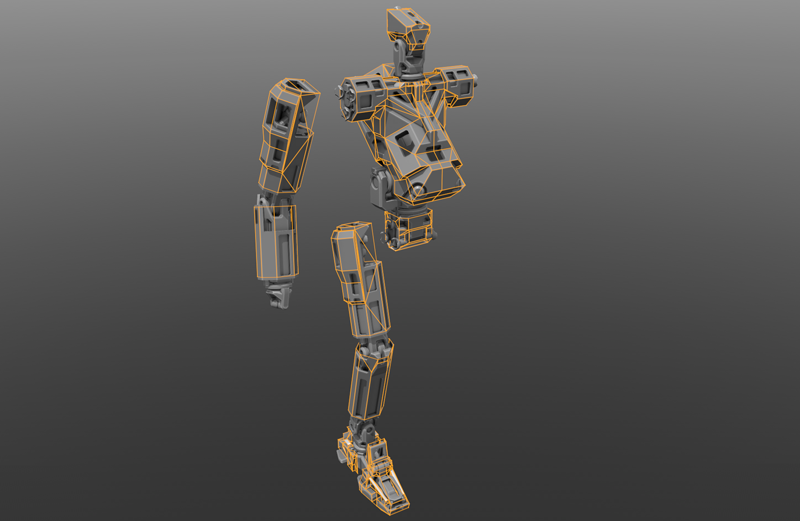
¶You can use this shell as a starting point for your armor that goes on top of the mech skeleton.
¶Add new geometry and keep the shell as an internal cavity.
¶Illustration of how the shell fits on top of the mech skeleton.
Note: Arm and leg parts are only provided for one side of the mech, you don't need to create mirrored versions for arms and legs manually
Both FBX files already have correct pivot points set up, so you can use them as a reference point for correct pivot location and orientation for each armor part.
Note: Armor parts that replace a part of mech skeleton should keep the skeleton's joints in place, so that all parts appear connected to each other in the game. You can copy the joint geometry from armor_set_skeleton-replace.fbx (Link).
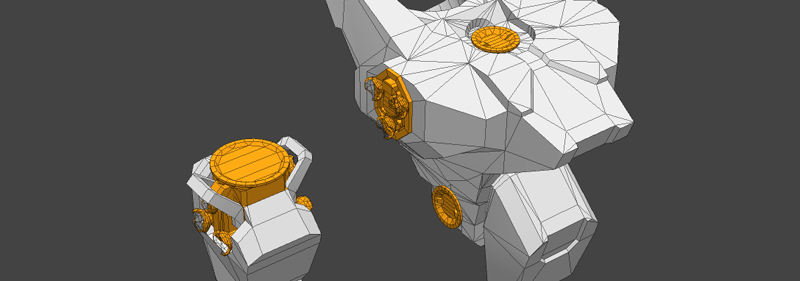
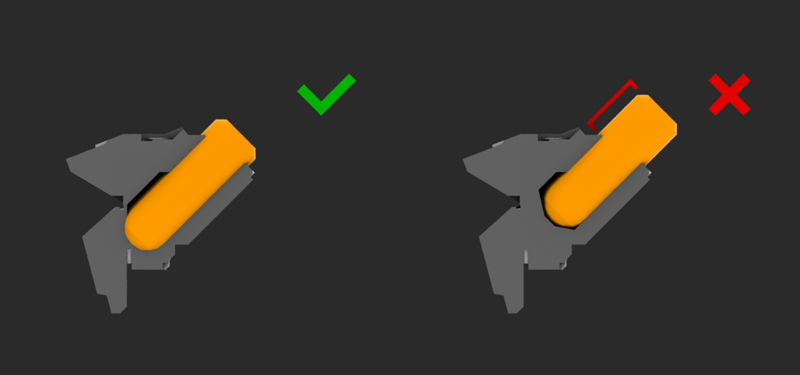
Note: If you are fully replacing the mech skeleton's torso piece with your own armor part, don't forget to leave space for pilot pod in your torso armor.
Generally we like to make sure pilot pod doesn't stick too far out of the torso, but you are free to position it however you want.
armor_set_skeleton-replace.fbx (Link) file uses default position and orientation for the pilot pod cavity, but custom pilot pod location and orientation is supported and can be configured within Unity's prefab via an additional override transform (more on that later).
pilot_pod_proxy.fbx (Link) can be used as a reference when making fully custom pilot pod cavity.
Note: you might want to use descent_thruster_mech_01_proxy.fbx (Link) when designing your torso, to make sure the torso's dimensions don't clip into the thrusters when they are attached to a mech.
Note: You are not forced to make every single armor part for a complete armor set. The game supports partial armor sets - for example, not every armor set in the game uses all 3 parts for foot armor.
¶Notice how there is no foot_tongue in the armor set on the left
You can also create just a shoulder and an arm part, for example, and then mix it with any existing armor on your mech from the game in the customization screen.
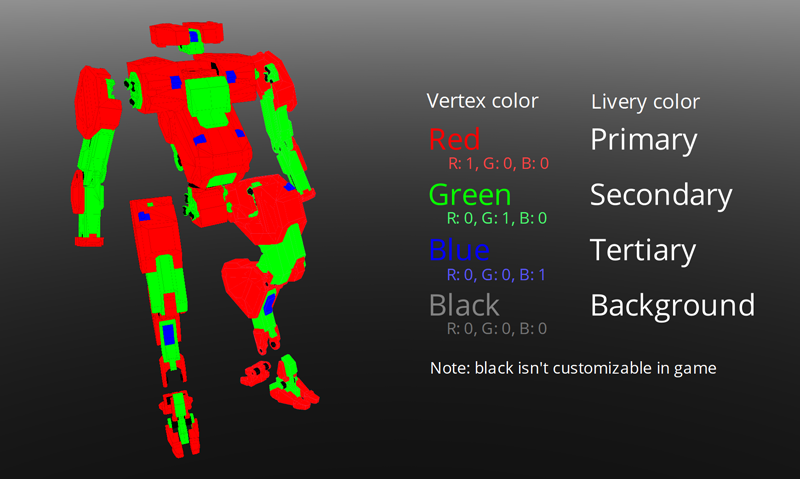
Each armor part usually has 1 to 4 specific vertex colors assigned. They are needed to paint the surface of your armor part a certain color from a livery preset in the game
¶Vertex colors and how they correspond to livery colors
Note: You can use Black - Background for deep cavities and parts of your armor that won't need coloring to boost visual contrast with colored areas.
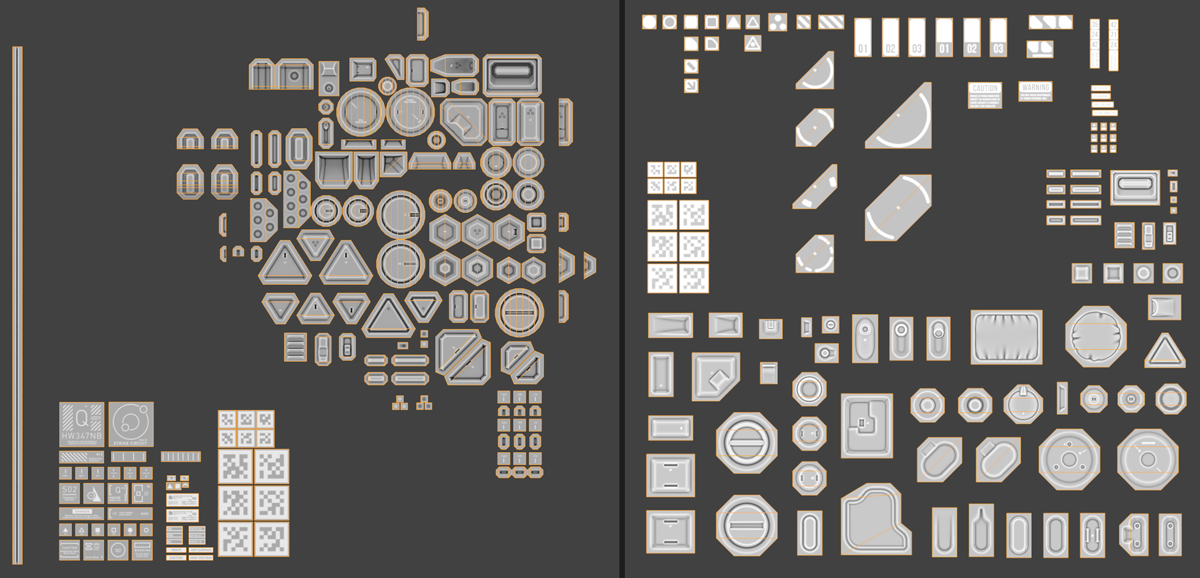
Decals add fine scale details that don't use real geometry and are applied like stickers on top of armor parts, they are responsible for all the small rivets, panels, hatches and signs on mech armor.
Hardsurface set is the most commonly used one, initially designed to be most versatile of the two. Organic set is made primarily for armor sets with smoother, round shapes (like on the Bein armor set).
Original in-game assets never mix the two decal sets on one armor, but nothing prevents you from doing that!
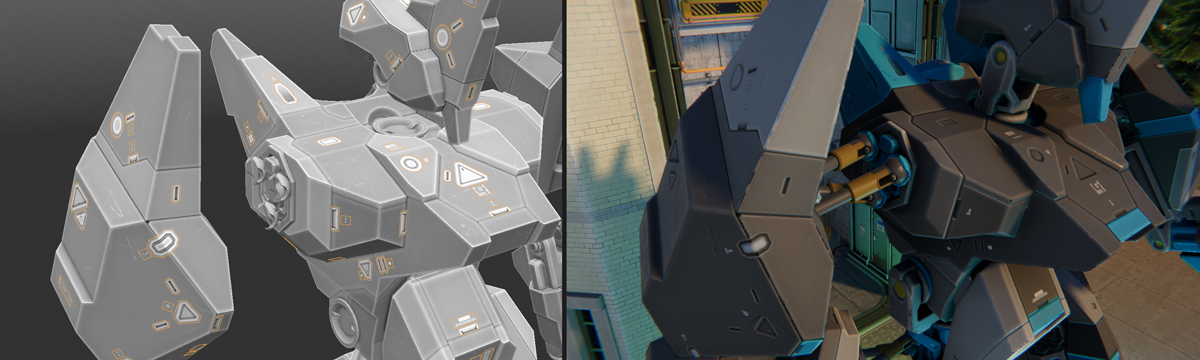
¶ How decals look in a 3D software and how they are rendered in-game
Note: To make sure there is no Z-fighting between armor surface and decals, push all decals approximately 1mm away from the armor surface
Note: Assigning vertex colors to decals is not required. There is a vertex color map on decal meshes that needs to be present, but it doesn't need to be tweaked or changed in any way.
Note: The Hardsurface set has a seam decal strip - it is only used on body parts of bosses. All mech armor shows panel seams via textures, but bosses needed a decal-based approach because of their scale (there is not enough texture resolution to show small-scale details like seams on bosses via texturing). However, you are free to use the seam decal on mech armor too, if you prefer.
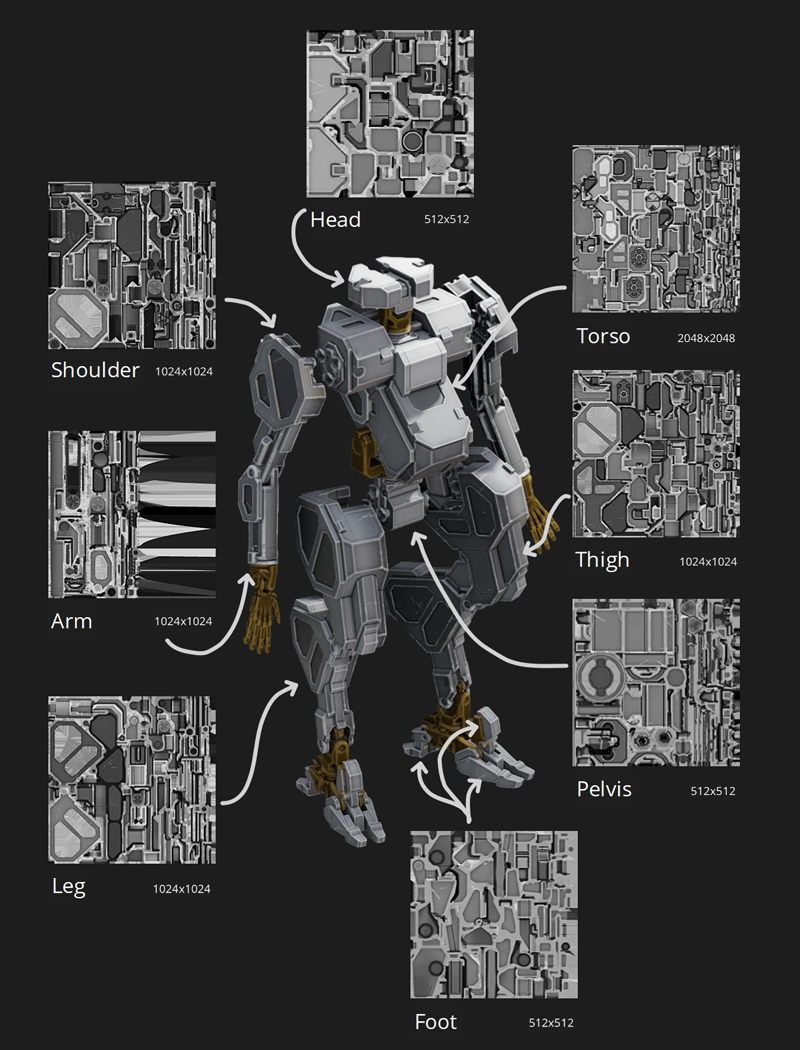
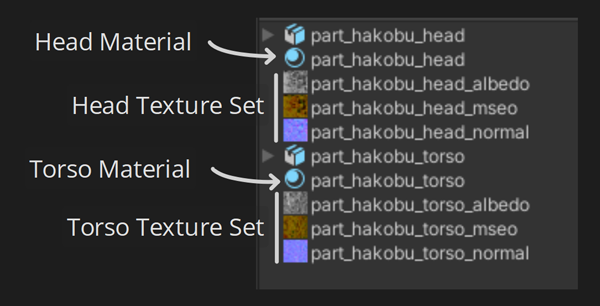
Original in-game assets use a separate texture set per armor part. However, this is not a requirement. You can split and bundle your meshes in however many texture sets. You are also free to choose any resolution you want.
¶Example of Hakobu armor set's textures and their resolutions
Note: Ideal texel density for the game is between 200 to 300 pixels per m². It is not recommeded to go below 200, however, mech armor textures can sometimes exceed 300 pixels per m².
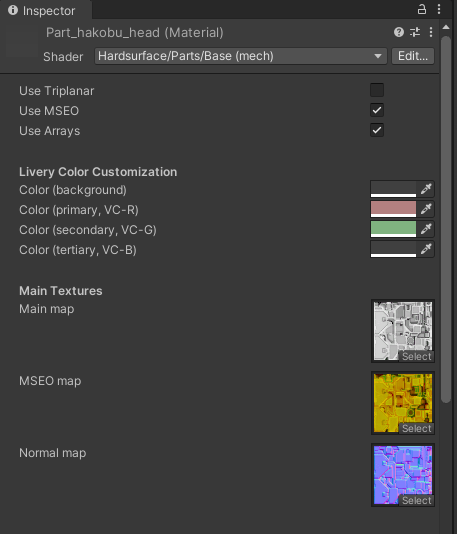
All original assets use several textures per armor part (a texture set per part). A fully finalized mech armor asset needs an Albedo map, a Normal map and an MSEO map (Metalness, Smoothness, Emission, Occlusion) for its material, more about each texture below.
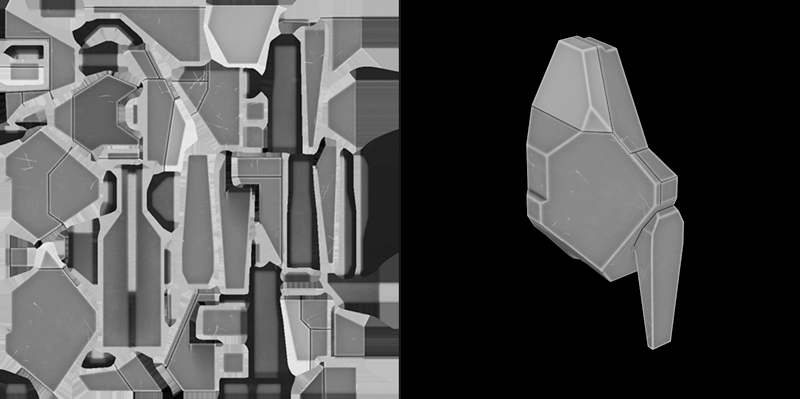
Albedo map used for armor is not a traditional albedo map from the PBR pipeline. It's a greyscale map with RGB (128,128,128) gray considered a baseline on flat surfaces. Anything darker than that is considered a seam, cavity, dirt or shadow, anything brighter is usually an edge or a scratch.
Albedo maps only use RGB channels by default (a note below explains why it keeps all 3 RGB channels, and is not a single channel).
¶Example albedo map texture of Tsubasa's thigh armor part
We use greyscale albedo textures to be able to apply livery colors on top of them with an 'overlay' blending mode in-game, to preserve shadows and highlights (in reality the actual blending is more complicated than that, but overlay blend is the most important part of it).
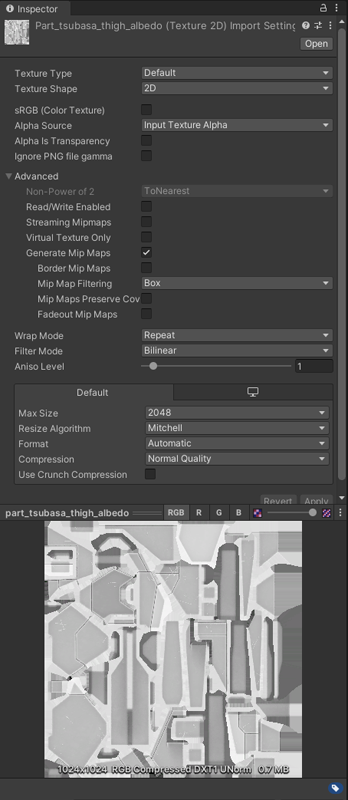
¶Albedo map texture setup in Unity. Note sRGB setting is off
Note: You can introduce colored elements in your albedo map. To make it work you need to add an Alpha channel to your texture. Mark colored elements black and leave everything else as white in this mask, then livery colors won't apply to these colored elements. Naturally, this way you can override livery colors for the entire part if you so desire.
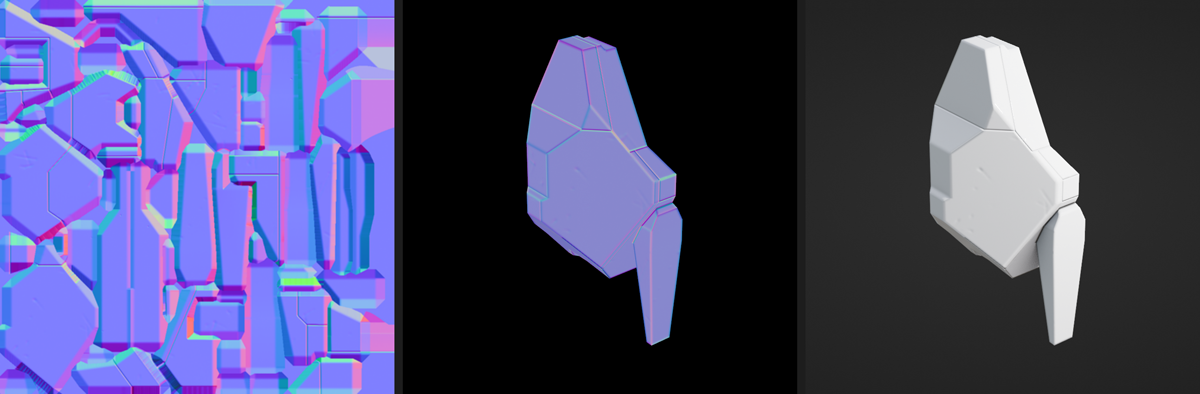
Normal map serves the standard purpose of adding subtle surface details, seam cavities and beveled edges to an otherwise low-poly geometry. It uses OpenGL normal map format.
¶Example normal map texture of Tsubasa's thigh armor part
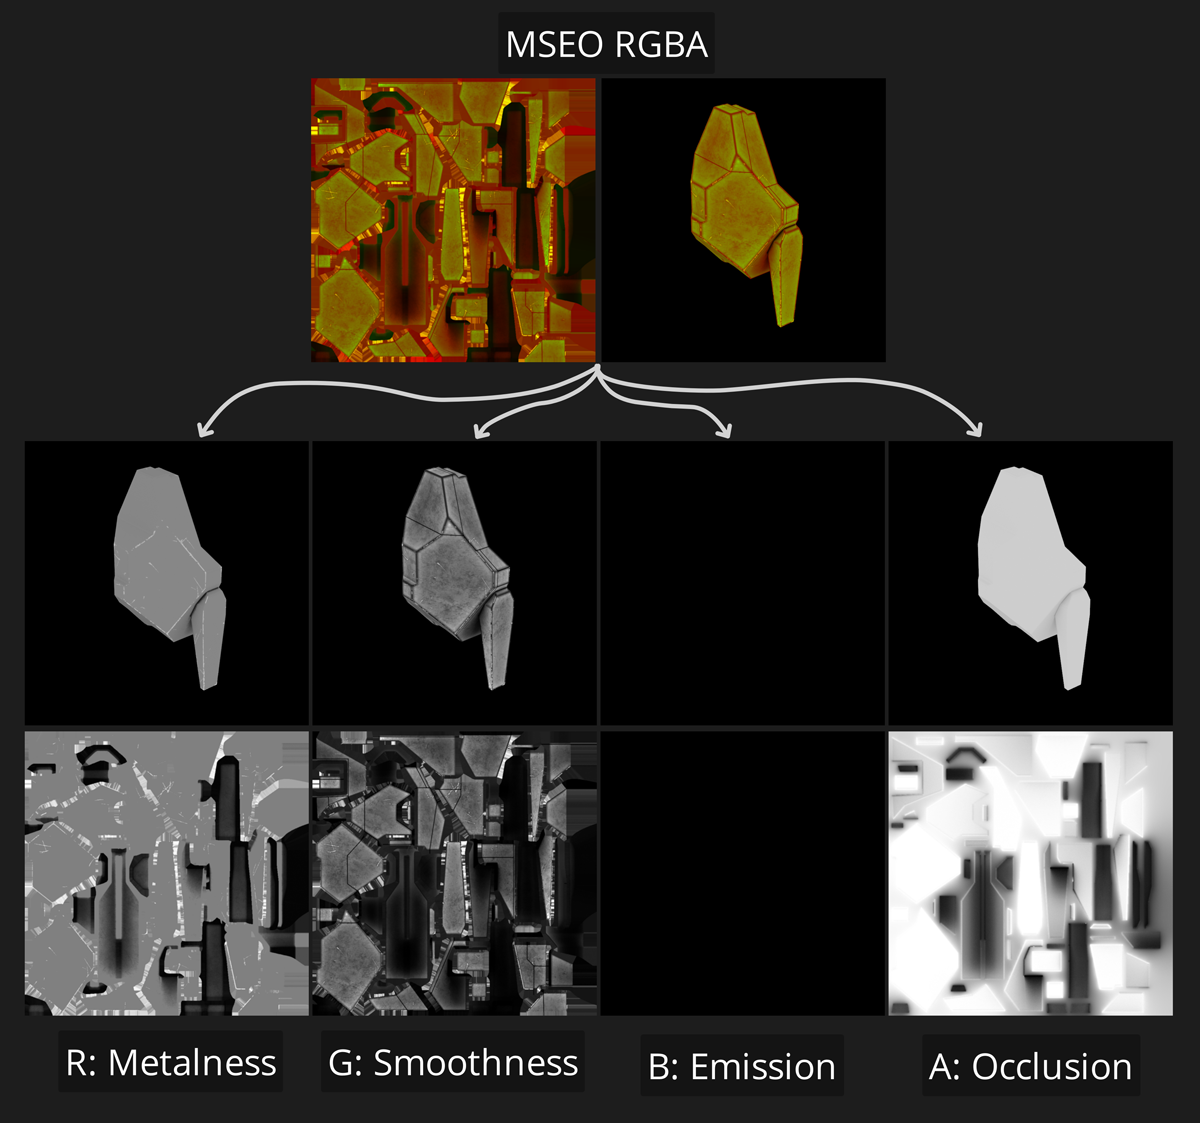
MSEO map is a texture that combines several surface properties in different channels for PBR to display materials correctly.
As mentioned above, the texture contains metalness, smoothness, emission and occlusion information:
Metalness makes the surface metallic and in our case often highlights surface scratches and stays uniform gray on most of the surface - this is done to enable easier metalness customization per livery preset later in the game via shaders.
Smoothness defines how rough or smooth the surface will be - this controls how much light the surface will diffuse or directly reflect. Armor edges always have reduced smoothness to control for specular aliasing.
Emission is an optional channel that usually stays black for 99% of all armor. Areas marked with white color in this channel will appear emissive in-game. Emission color is usually controlled by livery presets.
Occlusion contains baked ambient occlusion pass. Often times it would also contain approximate\averaged shadows from neighboring armor parts to improve its appearance in-game. This channel is used to darken albedo, reduce light reflection and add some procedural grime.
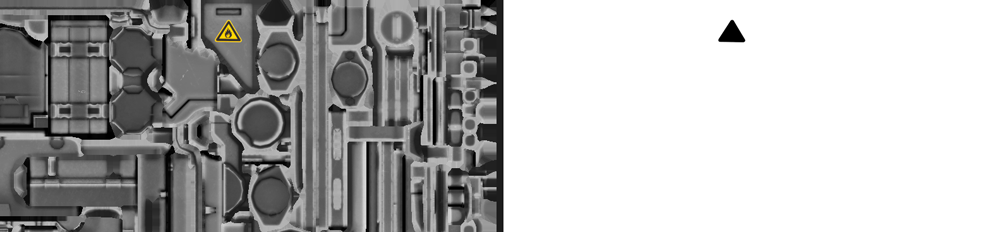
¶Example MSEO map texture of Tsubasa's thigh armor part
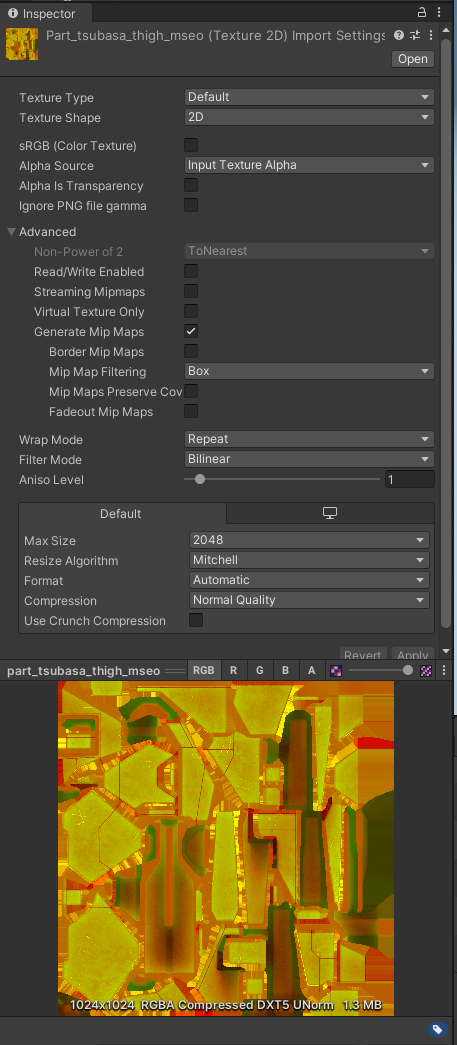
¶MSEO map texture setup in Unity. Note sRGB setting is off
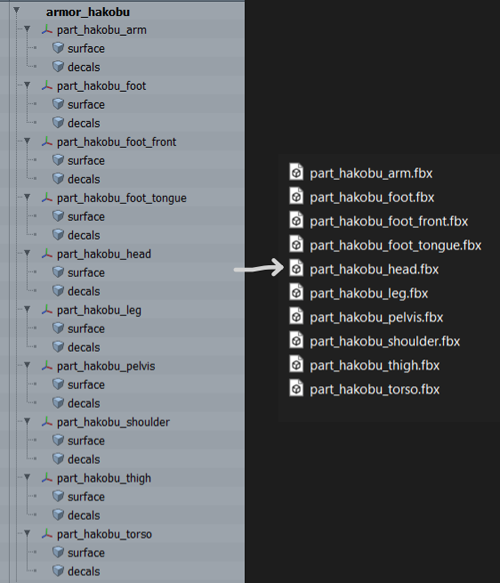
All original armor part assets contain a separate 'surface' mesh for armor surface and a separate 'decals' mesh for armor decals, nested under an empty transform with armor part name. Both of these meshes are exported into a single FBX file. See the scene hierarchy for each armor part and how it is translated into an FBX file below.
¶Scene hierarchy of each armor part and corresponding FBX files
All armor assets follow the naming structure 'part_[armor-name]_[bodypart]'. [armor-name] can use hyphens to separate words if your armor name contains more than one word. [bodypart] refers which mech skeleton's part this armor belongs to. Possible bodypart names: head, torso, pelvis, shoulder, arm, thigh, leg, foot, foot_front, foot_tongue.
Note: Following this name structure is important, as some asset automation scripts depend on it to properly detect which asset a user is working with in the SDK.
Note: The scene hierarchy mentioned above is not the only possible way to structure your asset for export. There are no strict requirements to how it should look and the suggested hierarchy is mostly there for convenience and consistency (only FBX naming is important). Check possible variants of asset scene hierarchy below.
¶Possible scene hierarchy per armor part before export
Note: Your armor can contain no decal geometry! It is not required to have both present in an armor part asset.
Note: Regardless of your scene hierarchy choice, make sure your root and\or your meshes have correct pivot location and orientation before export.
Note: If you don't have an MSEO map or don't want to use it, you can opt to use a more simplified material setup without it that will rely on surface information from Albedo map. In that case you can keep ‘Use MSEO’ option disabled. Keep in mind this approach is not used on any original asset and is not properly mainainted by developers at this moment.
In the imported mesh asset settings, go to Materials tab and assign your armor material and one of the two available decal materials.
With materials assigned, there are a couple more things left to configure. Back in your armor material, disable 'Use Arrays' temporarily. Now you will be able to tweak how damage effects look on your armor part.
Scroll down to 'Damage Effects' section and crank up the first number in the Damage parameter. You should see surface damage appear on your armor
From there, tweak 'Damage map scale' parameter to your liking until scratches and bullet holes don't look too big or too small
Note: If you don't like how damage texture looks on your armor part (maybe your UVs don't work for it very well and damage looks too discontinous), enable 'Use Triplanar' at the top of the material settings. Keep in mind this makes your mech part more expensive to render.
Back to the 'Damage' parameter, crank up the second number up to about 0.4 or 0.5 - this will show your armor part's destruction progression
Here, you might want to tweak all the 'Destruction area ...' parameters as well as 'Stripping direction' to your liking, to make sure when the part explodes its chunks fly and evarorate the way you want
After all your meshes and materials have been configured, you will need to create a prefab per armor part that the game will recognize. It can either be a standalone prefab or a prefab variant of your mesh.
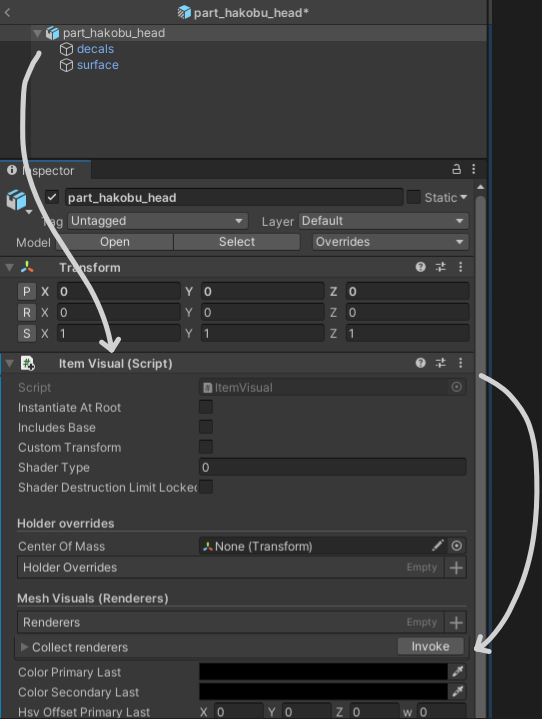
Inside each prefab, add 'Item Visual' component to your root transform and press 'Invoke' button next to 'Collect renderers', this will populate the 'Renderers' list with all Mesh Renderers present in your armor part
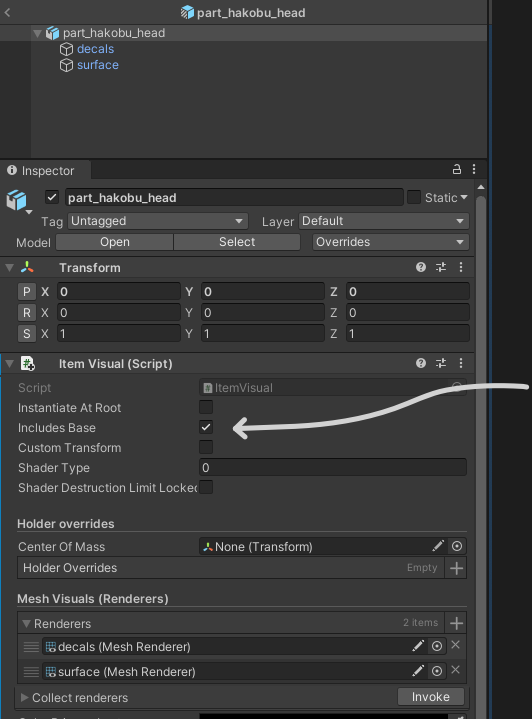
Additionally, if your armor part replaces part of mech skeleton, make sure you have 'Includes Base' enabled:
¶Enable this setting if armor part replaces part of mech skeleton
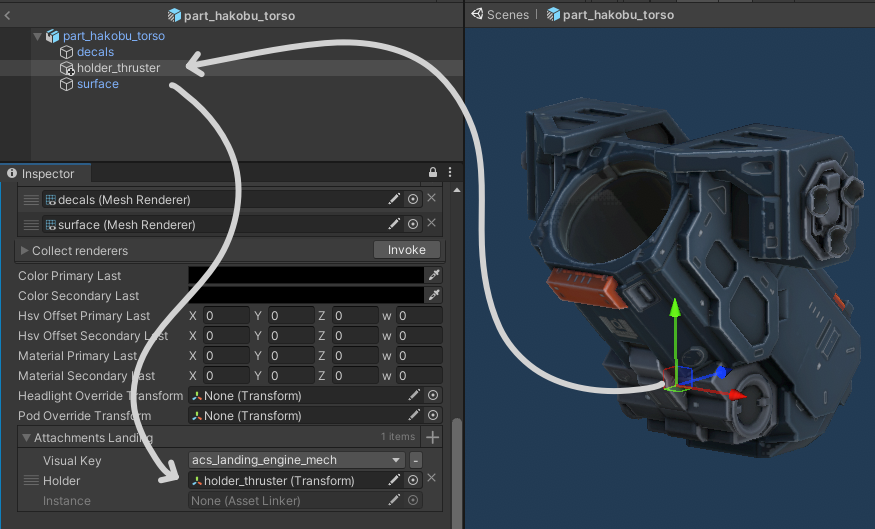
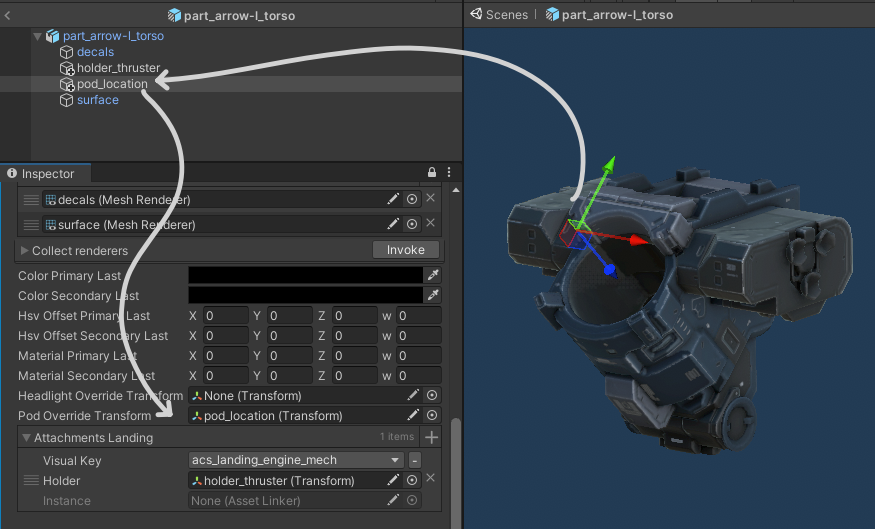
Note: For torso armor, make sure you define mech thruster position as well, which will be used on all mechs flying into the battlefield from air.
Go to 'Item Visual' component, find 'Attachments Landing' list, add a new entry to the list
Set 'Visual Key' to 'acs_landing_engine_mech'
Import mech thruster proxy FBX descent_thruster_mech_01_proxy.fbx (Link), position it in your prefab (make sure it aligns with pilot pod opening), create an empty transform that copies the proxy thruster's transform
Assign that transform to the 'Holder' field in the 'Attachments Landing' list
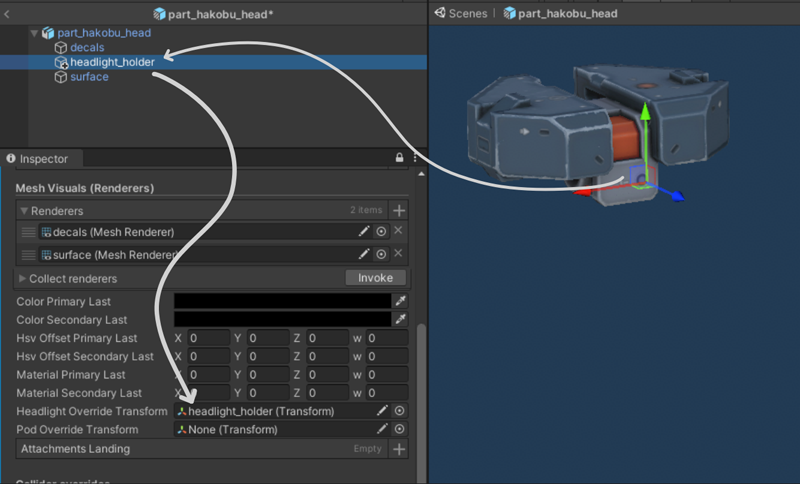
Note: For head armor, you can customize the location of the headlight that is active during night missions. Create an empty transform, position it and assign it to the 'Headlight Override Transform' field
Last, recommended file structure: put all armor prefabs in 'armor-name' folder, with all meshes, textures and materials in a separate assets folder inside the parent folder:
Note: The prefab names copy mesh names convention, with an exception for foot prefabs. For correct mech armor assembly during gameplay, make sure:
Foot tongue armor is named 'part_[armor-name]_foot0_tongue' (mesh name 'part_[armor-name]_foot_tongue')
Foot front armor is named 'part_[armor-name]_foot1_front' (mesh name 'part_[armor-name]_foot_front')
Foot armor is named 'part_[armor-name]_foot3_heel' (mesh name 'part_[armor-name]_foot')