This is an official reference page. If you encounter inaccuracies or would like to expand the page, please message the developers in the #phantom-modding channel on BYG Discord.
This guide assumes you have the Phantom Brigade Mod SDK installed. You can create models and textures in any software of your preference, but you will need the fully imported Unity Project to set up the Prefabs with ItemVisual components mentioned in the last part of this tutorial, and to include the 3D assets you create into a mod. Once you're done setting up assets in Unity, follow the Custom Models tutorial in the Getting Started SDK window to export them into your mod.
Note: Knowledge of 3D modelling software and Unity editor is required for this guide
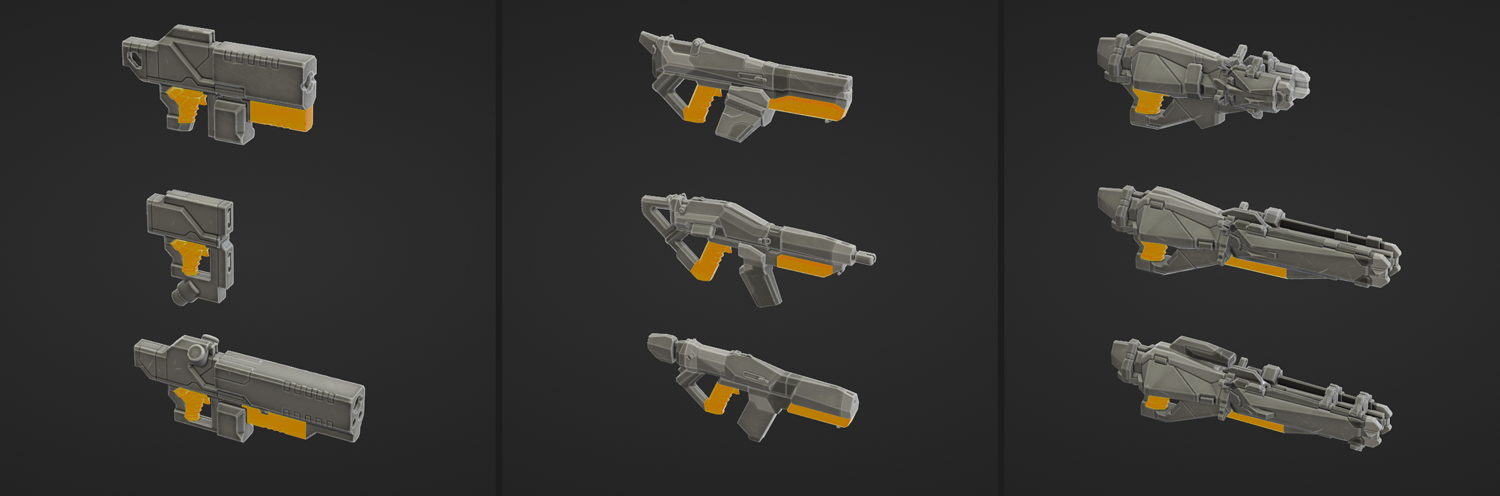
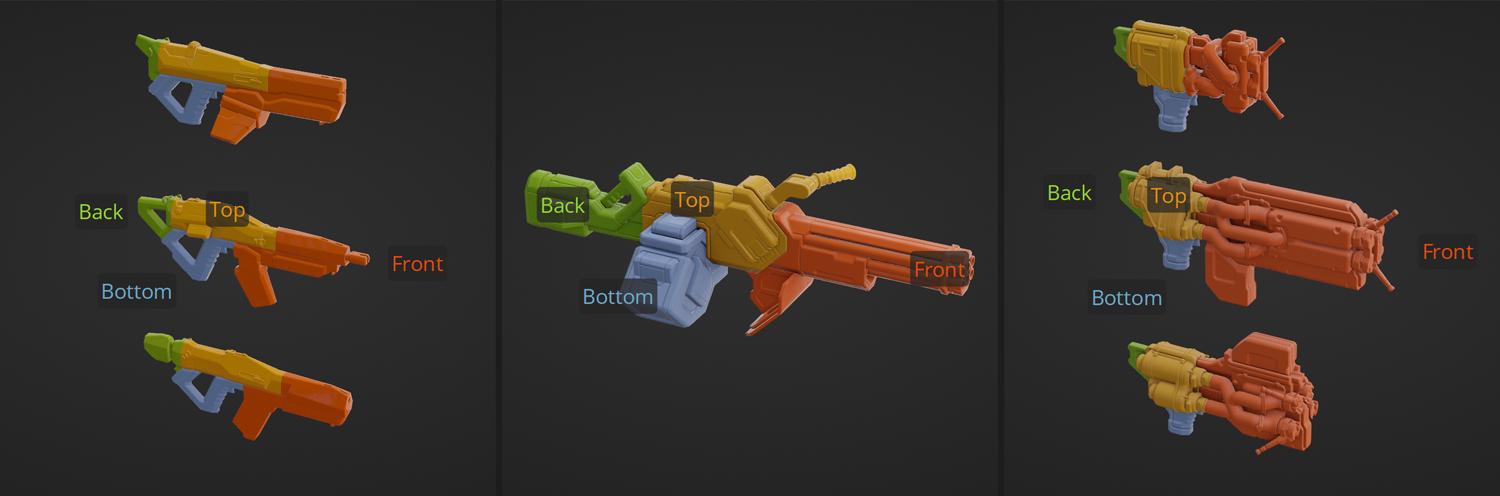
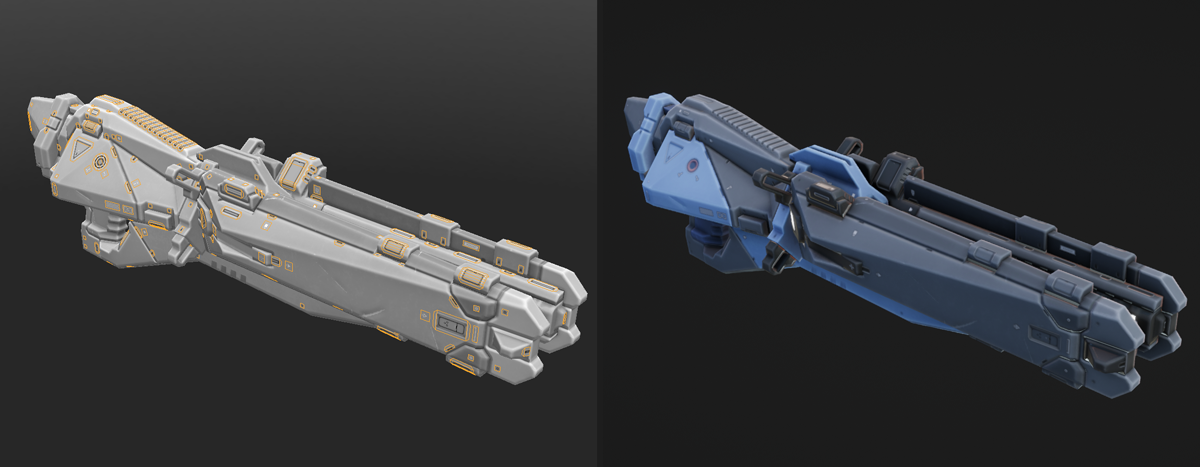
Unlike mechs, weapons don't have a predefined underlying structure. Weapon design is mainly restricted by two things: fixed grip location and overall dimensions (to avoid excessive clipping into mech armor).
¶Weapons' main and front grip fixed location highlighted in orange
¶Notice how weapon grips stay roughly in the same place while everything else gets a stronger variety
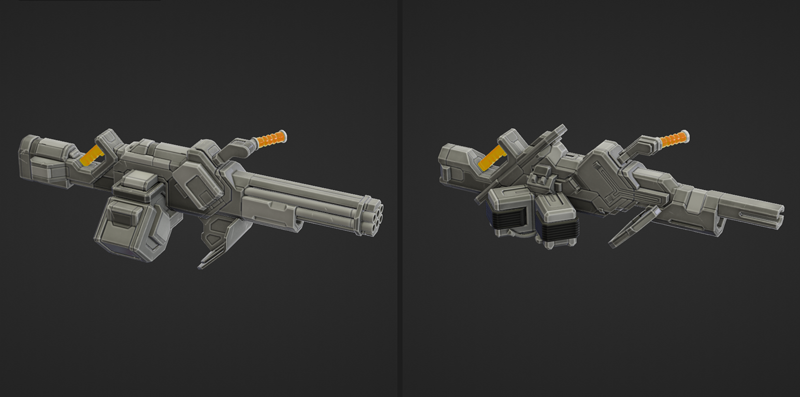
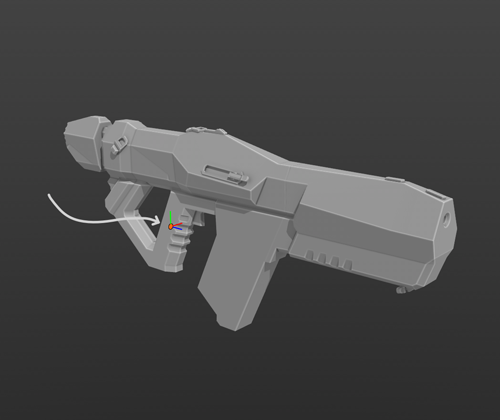
Ultra-heavy weapons get the same restrictions, except their grip locations are different from regular weapons.
¶Ultra-heavy weapons' main and front grip fixed location highlighted in orange
¶Same with ultra-heavy weapons, their shape can vary, but the grips stay in the same place
Maximum dimension restrictions are not enforced in any way (just FYI, in an unlikely case you want to make a huge handheld cannon), but grip location and orientation is determined by mech animation and cannot be changed.
[OPTIONAL] Almost all of the original weapon assets are built out of separate modules, mainly to produce better variety out of existing content. This allows us to swap just one or two modules to produce a different looking weapon.
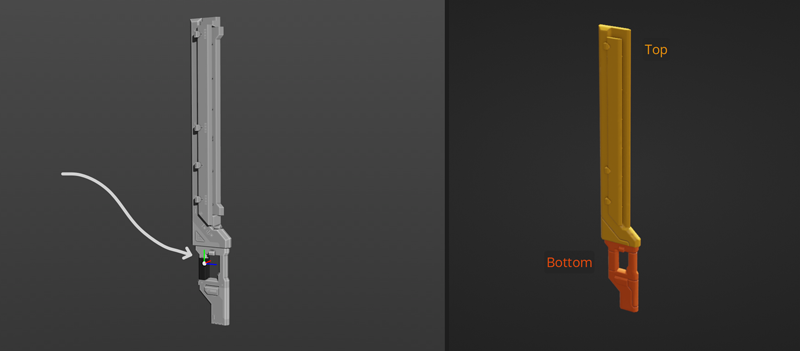
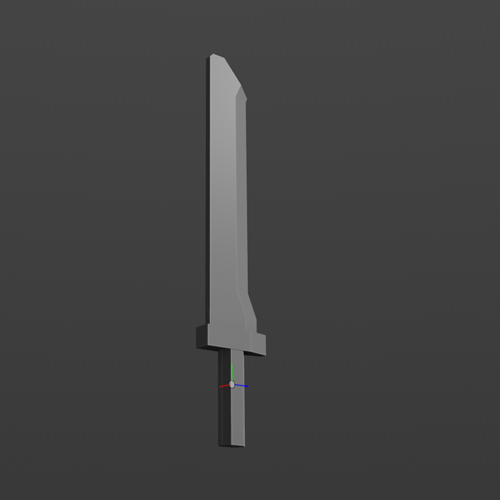
Everything mentioned above applies to melee as well. Melee weapons have a pre-defined pivot and grip location and can be built out of modules, if preferred.
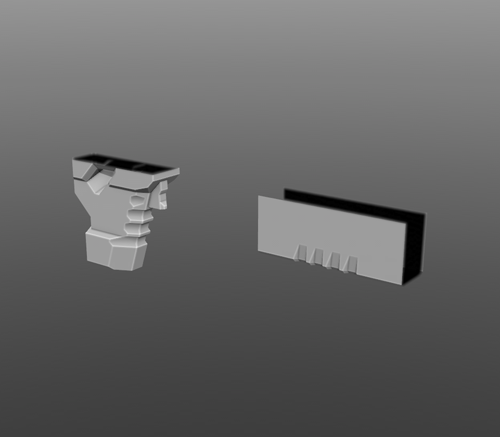
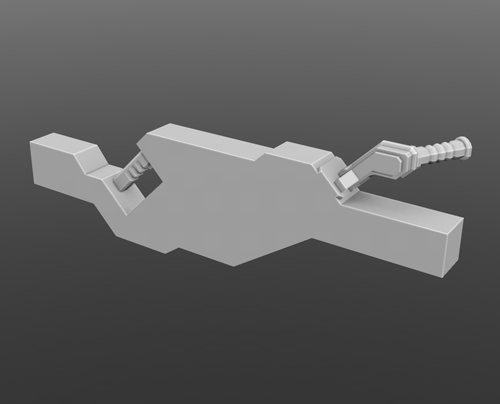
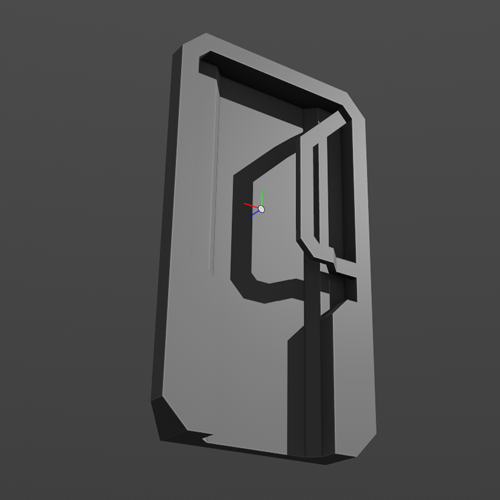
¶Origin pivot point location for melee weapons and possible color-coded way of splitting a melee weapon into modules
Below you can find a sample FBX file for grip reference location.
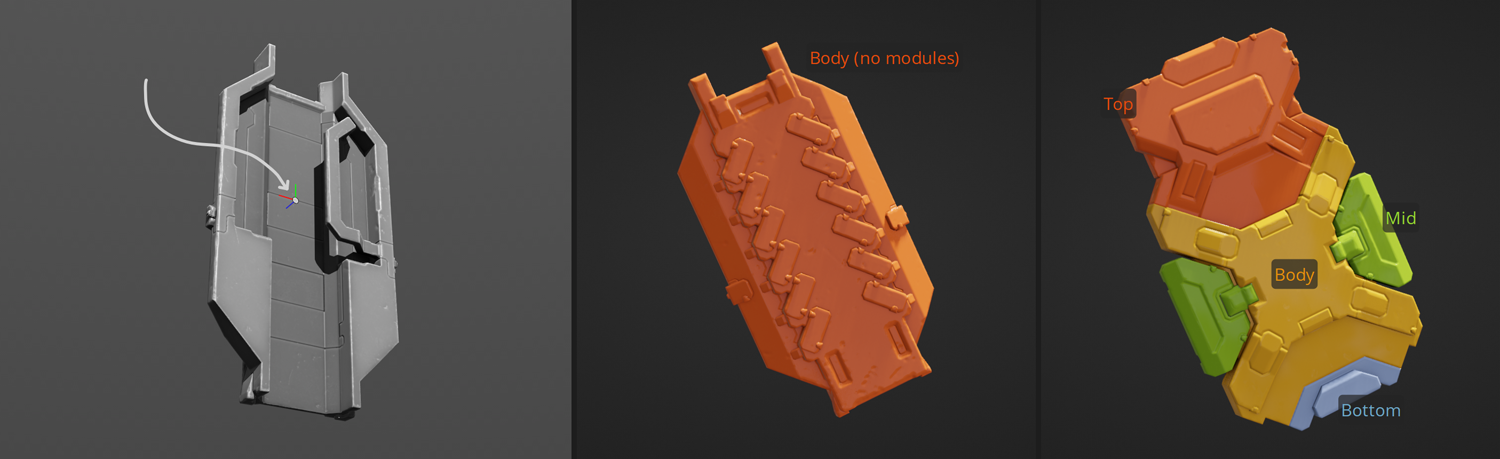
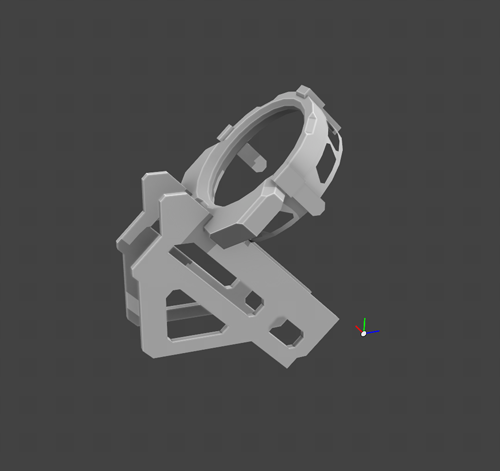
Just like with melee, everything mentioned in the weapons section above applies to shields as well. Shields have a pre-defined pivot and grip location and can be built out of modules, if preferred.
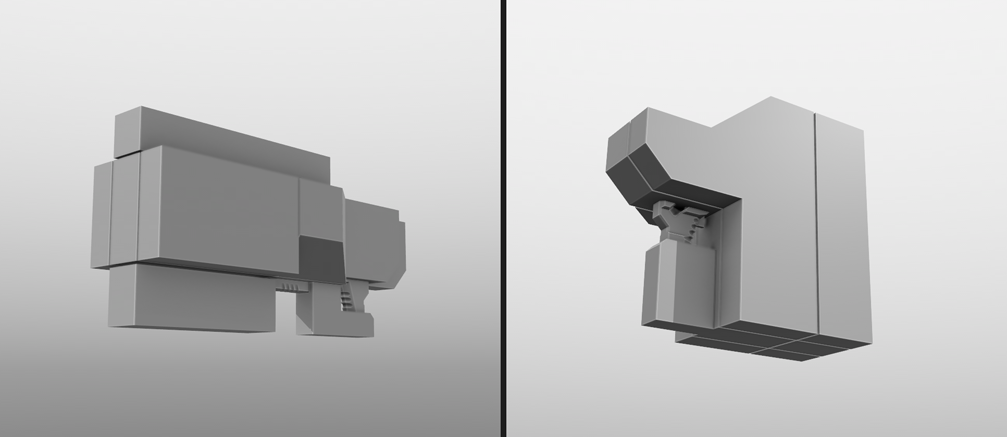
¶Origin pivot point location for shields and two examples: the first shield uses a single mesh piece, and the second is built out of several modules
Shields require a specific grip shape that cannot be relocated due to animation restrictions, but everything else can be designed in any way desired.
Below you can find a sample FBX file for pivot and grip reference location.
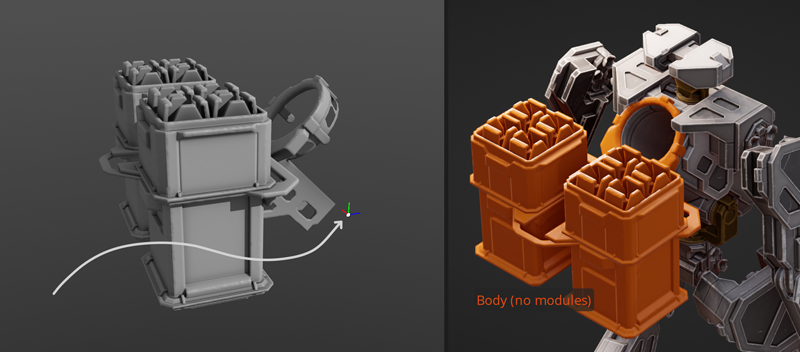
Contrary to most weapons, backpacks can have a variety of functions and are not attached to mechs' hands.
All original backpacks are attached to mech's pod opening, but behind the scenes it's just an attachment to mech's torso, so you are free to place your item anywhere you want relative to the torso part.
Your main challenge will be visually matching backpack's geometry to the variety of torso armor shapes (if that matters to you in the first place). That's why mech torso's pod opening was chosen for the original assets, as it's one of the spots on the mech that doesn't vary too much across all torso parts and armor sets.
¶Pivot point location on backpacks, and an example of a backpack that uses a single mesh piece (all original backpacks are built like this)
If you want to follow the established pod opening attachment design in your work, there is an FBX file with a backpack harness proxy and proper pivot position already configured (and feel free to alter the harness design however you want!).
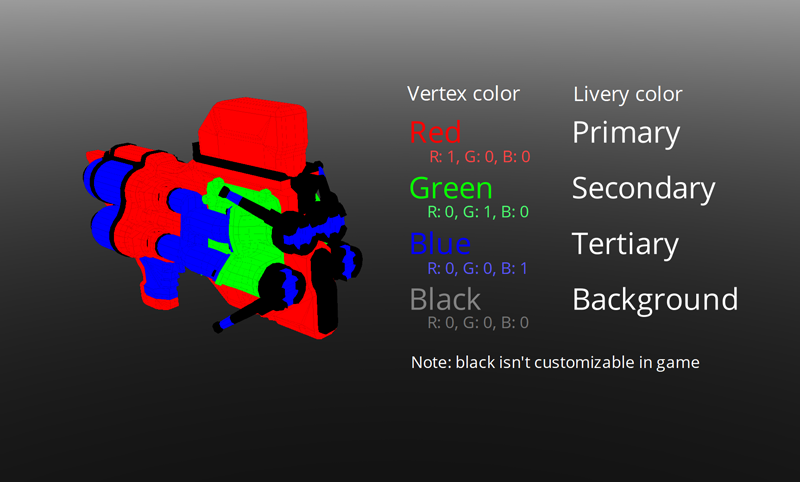
Each weapon or item usually has 1 to 4 specific vertex colors assigned. They are needed to paint the surface of your weapon a certain color from a livery preset in the game
¶Vertex colors and how they correspond to livery colors
Note: You can use Black - Background for certain parts of your weapon that won't need coloring to boost visual contrast with colored areas.
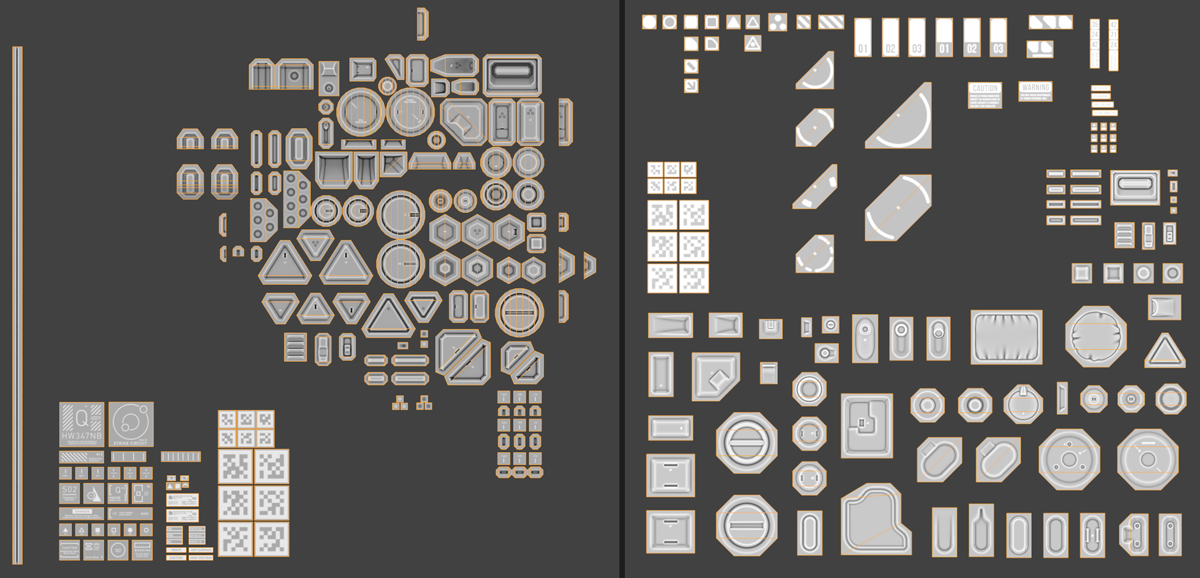
Decals add fine scale details that don't use real geometry and are applied like stickers on top of weapons, they are responsible for all the small rivets, panels, hatches and signs
Hardsurface set is the most commonly used one, initially designed to be most versatile of the two. Organic set can be used on weapons with smoother, round shapes.
Original in-game assets never mix the two decal sets on one weapon, but nothing prevents you from doing that!
¶ How decals look in a 3D software and how they are rendered in-game
Note: To make sure there is no Z-fighting between weapon surface and decals, push all decals approximately 1mm away from the weapon surface
Note: Assigning vertex colors to decals is not required. There is a vertex color map on decal meshes that needs to be present, but it doesn't need to be tweaked or changed in any way.
Note: The Hardsurface decal set has a seam decal strip - it is only used on body parts of bosses. All weapons show panel seams via textures, but bosses needed a decal-based approach because of their scale (there is not enough texture resolution to show small-scale details like seams on bosses via texturing). However, you are free to use the seam decal on weapons and items too, if you prefer.
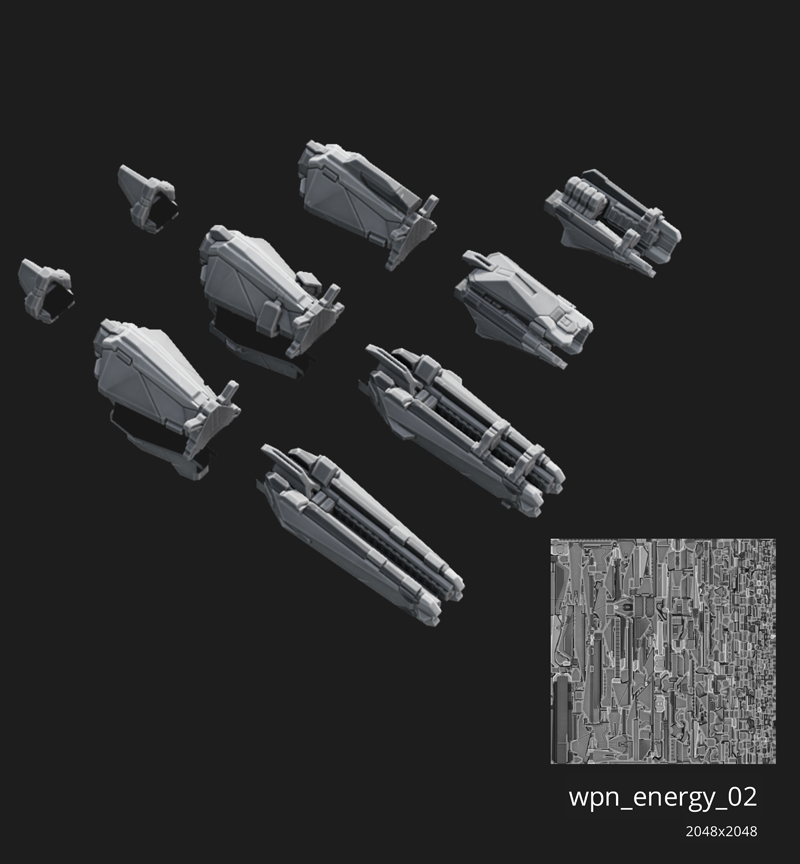
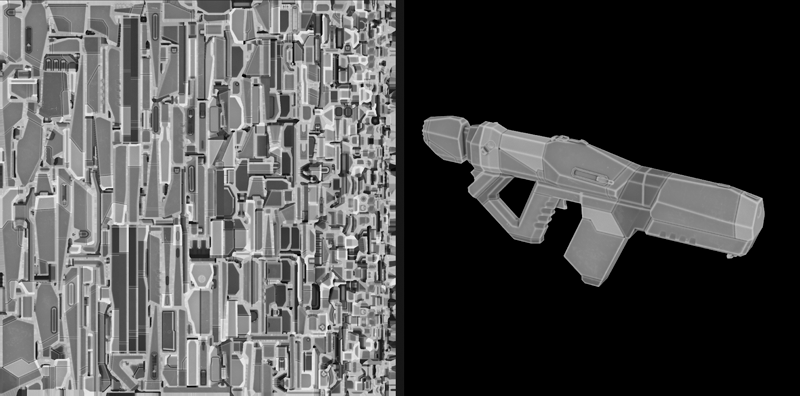
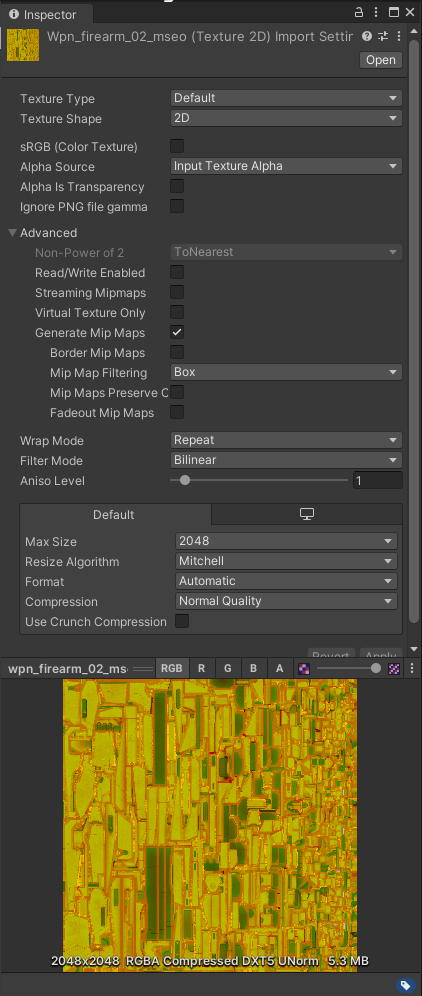
All original in-game weapons are split in lots of modular pieces, but they all usually share just 1 or 2 texture sets, for optimization. A single texture set usually consists of albedo map texture, normal map texture and MSEO map texture (more on these below). You are free to use as many texture sets as you need. The amount of mesh pieces your weapon has is independent from how many texture sets you might want to use.
¶Example of a weapon set's shared texture and its resolution
Note: Ideal texel density for the game is between 200 to 300 pixels per m². It is not recommeded to go below 200 pixels per m².
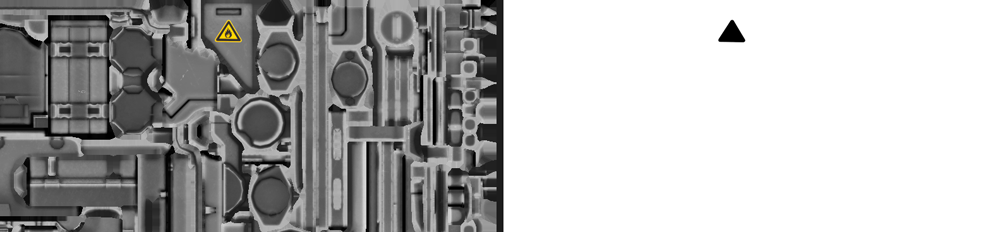
All original assets use several textures per weapon or item. A fully finalized weapon or item material needs an Albedo map, a Normal map and an MSEO map (Metalness, Smoothness, Emission, Occlusion), more about each texture below.
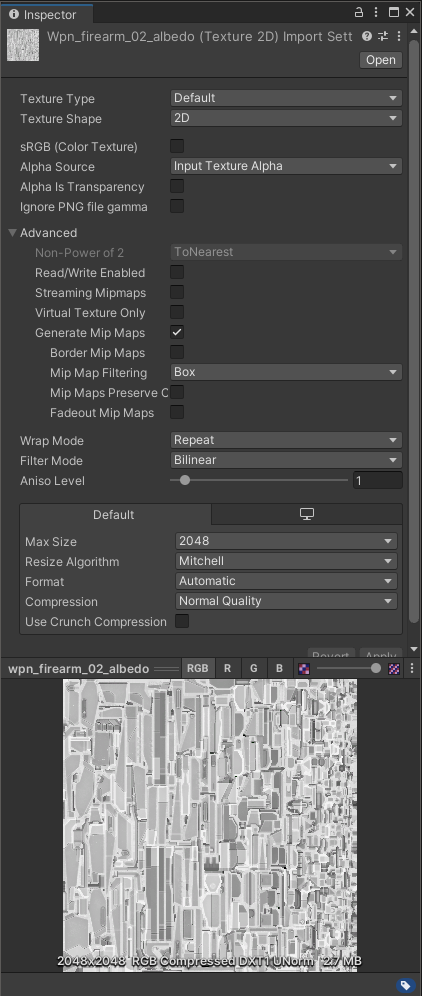
Albedo map used for weapons and items is not a traditional albedo map from PBR pipeline. It's a greyscale map with RGB (128,128,128) gray considered a baseline on flat surfaces. Anything darker than that is considered a seam, cavity, dirt or shadow, anything brighter is usually an edge or a scratch.
Albedo maps only use RGB channels by default (a note below explains why it keeps all 3 RGB channels, and is not a single channel).
We use greyscale albedo textures to be able to apply livery colors on top of them with an 'overlay' blending mode in-game, to preserve shadows and highlights (in reality the actual blending is more complicated than that, but overlay blend is the most important part of it).
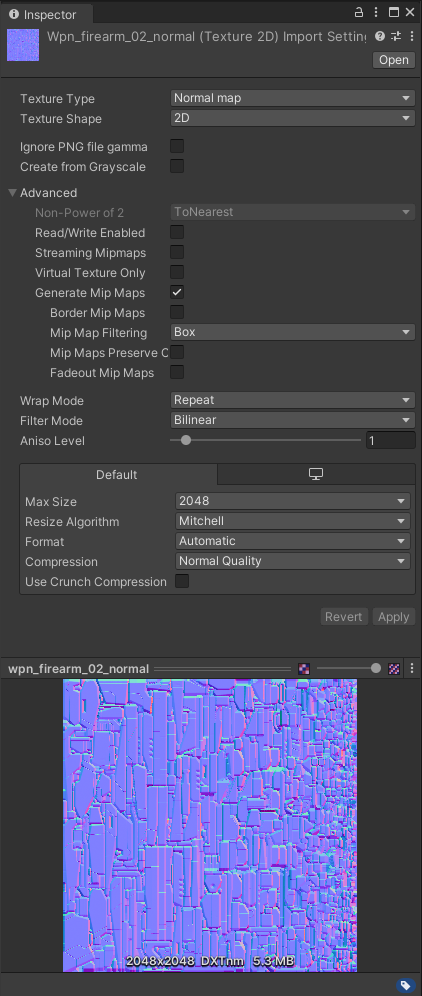
¶Albedo map texture setup in Unity. Note sRGB setting is off
Note: You can introduce colored elements in your albedo map. To make it work you need to add an Alpha channel to your texture. Mark colored elements black and leave everything else as white in this mask, then livery colors won't apply to these colored elements. Naturally, this way you can override livery colors for the entire part if you so desire.
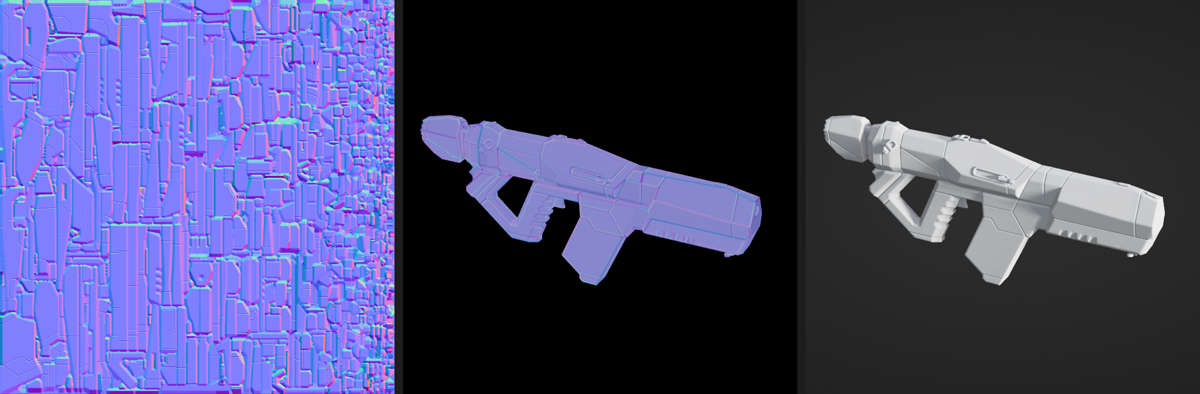
Normal map serves the standard purpose of adding subtle surface details, seam cavities and beveled edges to an otherwise low-poly geometry. It uses OpenGL normal map format.
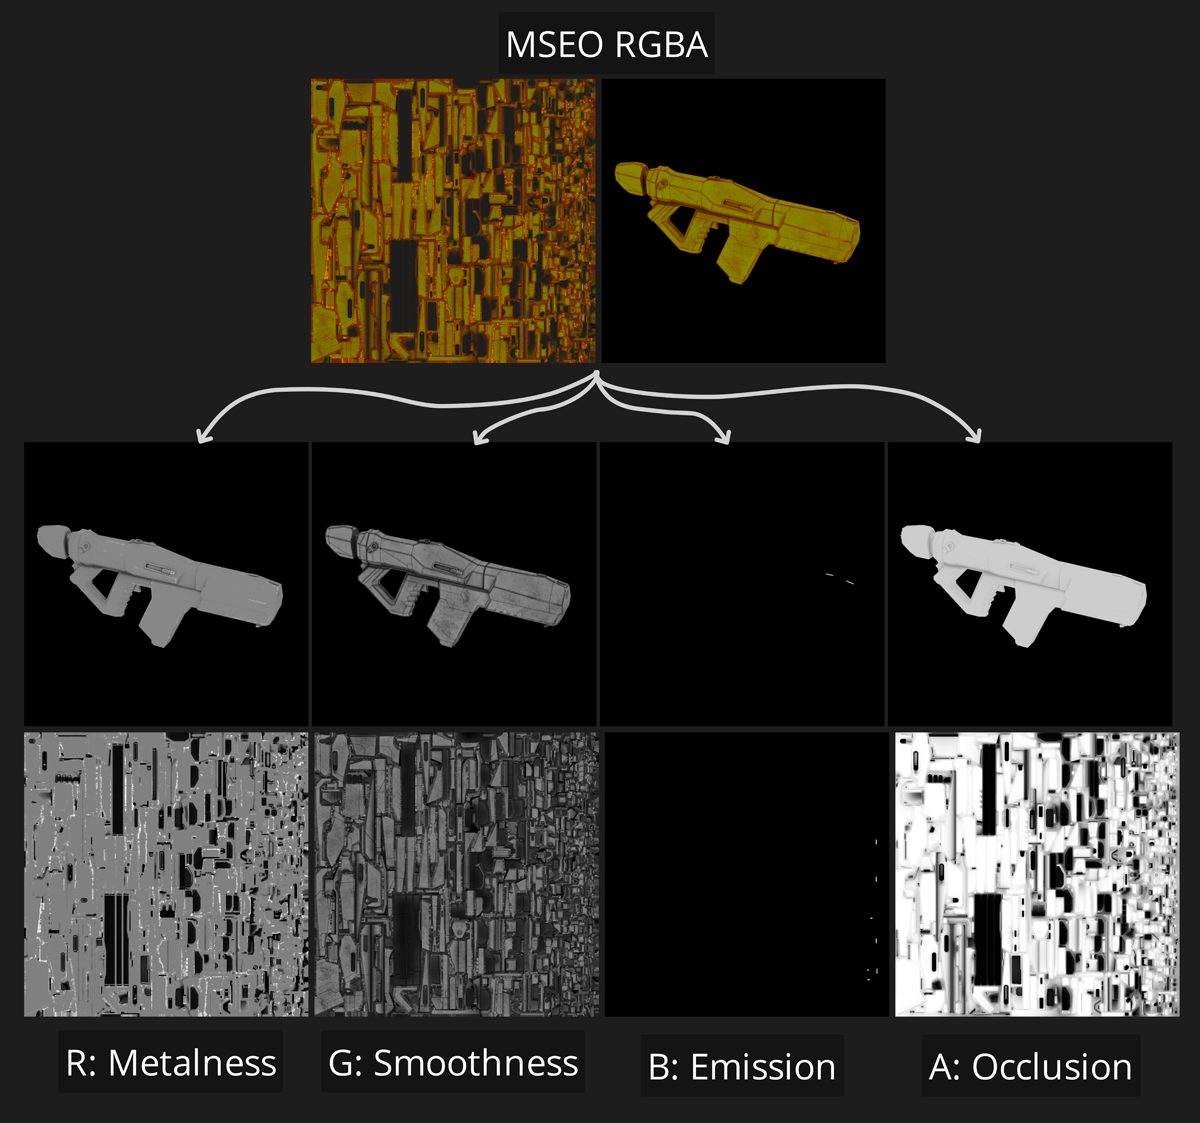
MSEO map is a texture that combines several surface properties in different channels for PBR to display materials correctly.
As mentioned above, the texture contains metalness, smoothness, emission and occlusion information:
Metalness makes the surface metallic and in our case often highlights surface scratches and stays uniform gray on most of the surface - this is done to enable easier metalness customization per livery preset later in the game via shaders.
Smoothness defines how rough or smooth the surface will be - this controls how much light the surface will diffuse or directly reflect. Weapon's or item's edges always have reduced smoothness to control for specular aliasing.
Emission is an optional channel that usually contains small lights and emissive parts on energy weapons. Areas marked with white color in this channel will appear emissive in-game. Emission color is usually controlled by livery presets.
Occlusion contains baked ambient occlusion pass. This channel is used to darken albedo, reduce light reflection and add some procedural grime.
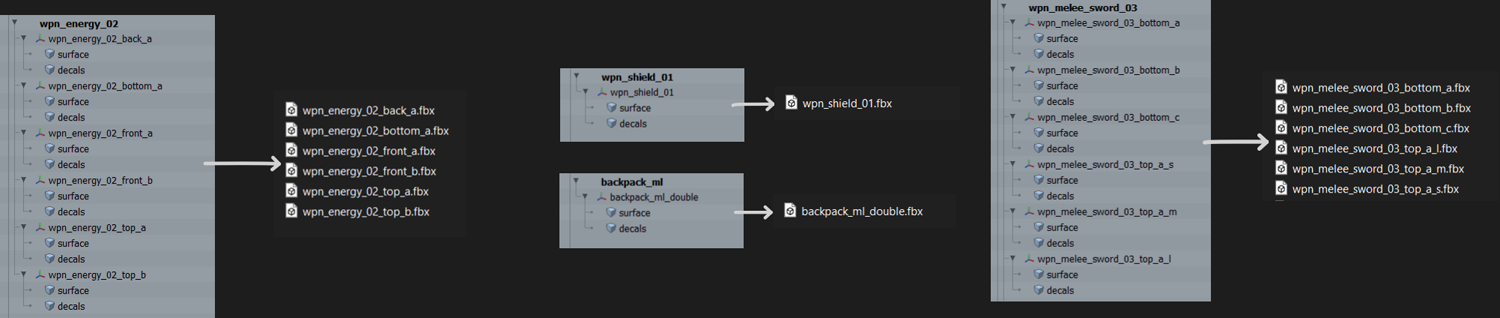
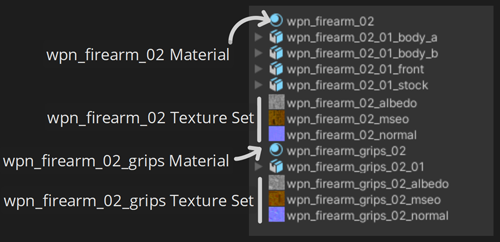
All original weapon or item assets contain a separate 'surface' mesh for weapon\item surface and a separate 'decals' mesh for decals, nested under an empty transform with a weapon\item name. Both of these surface and decal meshes are exported into a single FBX file. See the various examples of a scene hierarchy for each weapon\item module and how it is translated into an FBX file below.
¶Scene hierarchy of various weapons\items and corresponding FBX files
There are no specific naming requirements, but all weapons are usually prefixed with 'wpn_', and backpacks start with 'backpack_'. You are free to use these naming conventions, or choose something else. The established naming convention might help if you intend to use asset automation scripts.
Note: The scene hierarchy mentioned above is not the only possible way to structure your asset for export. There are no strict requirements to how it should look and the suggested hierarchy is mostly there for convenience and consistency. Check possible variants of asset scene hierarchy below.
¶Possible scene hierarchy for weapons before export
Note: Your weapons can contain no decal geometry! It is not required to have both present in any weapon asset.
Note: Regardless of your scene hierarchy choice, make sure your root and\or your meshes have correct pivot location and orientation before export.
After you imported your meshes and textures, you will need to create materials. Create a material per texture set.
¶As mentioned above, you can use however many texture sets you require for your weapons or items.
¶In this case all grips had to go on a separate texture set because it was impossible to fit everything into one texture with a reasonable texel density.
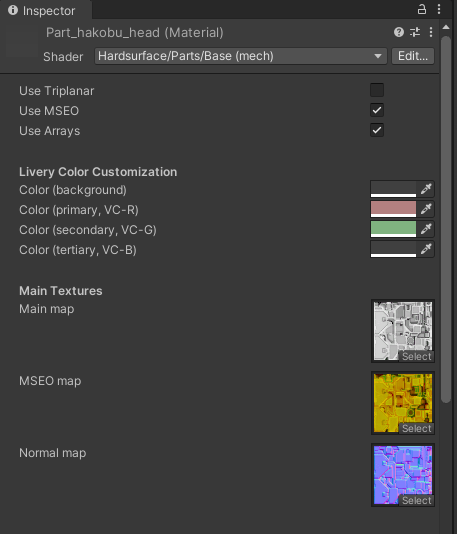
Each material needs to use 'Hardsurface/Parts/Base (mech)' shader.
In the material settings:
Make sure 'Use MSEO' is enabled. MSEO maps are needed to fully utilize PBR.
Make sure 'Use Arrays' is enabled. Array data is needed for livery and damage effects to work.
Note: If you don't have an MSEO map or don't want to use it, you can opt to use a more simplified material setup without it that will rely on surface information from Albedo map. In that case you can keep ‘Use MSEO’ option disabled. Keep in mind this approach is not used on any original asset and is not properly mainainted by developers at this moment.
In the imported mesh asset settings, go to Materials tab and assign your weapon material and one of the two available decal materials.
With materials assigned, there are a couple more things left to configure. Back in your weapon\item material, disable 'Use Arrays' temporarily. Now you will be able to tweak how damage effects look on your asset.
Scroll down to 'Damage Effects' section and crank up the first number in the Damage parameter. You should see surface damage appear on your weapon\item
From there, tweak 'Damage map scale' parameter to your liking until scratches and bullet holes don't look too big or too small
Note: If you don't like how damage texture looks on your weapon or item (maybe your UVs don't work for it very well and damage looks too discontinous), enable 'Use Triplanar' at the top of the material settings. Keep in mind this makes your material more expensive to render.
Back to the 'Damage' parameter, crank up the second number up to about 0.4 or 0.5 - this will show your weapon's\item's destruction progression
Here, you might want to tweak all the 'Destruction area ...' parameters as well as 'Stripping direction' to your liking, to make sure when the part explodes its chunks fly and evarorate the way you want
After all your meshes and materials have been configured, you will need to create prefabs per each item\weapon module that the game will recognize. It can either be a standalone prefab or a prefab variant of your mesh.
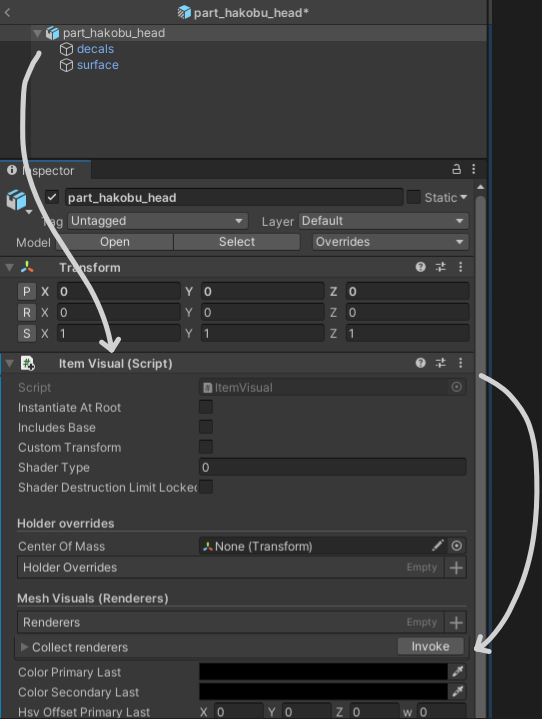
Inside each prefab, add 'Item Visual' component to your root transform and press 'Invoke' button next to 'Collect renderers', this will populate the 'Renderers' list with all Mesh Renderers present in your weapon module or item
Note: For weapons, make sure you define FX transforms for any barrel that your weapon has in the prefab. This is where the muzzle flash effects will spawn.
Add a new Transform object and place it near your barrel
Go to 'Item Visual' component, find 'Activation Links' list, add a new entry to the list
It is also possible to have more than one FX transform, if you have multiple barrels. The game will create a muzzle flash effect and spawn a bullet from each fx transform in a sequential order (the order it was added to the list) - just repeat the process outlined above for each barrel.
¶An example of multiple FX Transforms in a missile backpack
Note: For melee weapons, all shockwave parameters (both visual and gameplay) are defined through configs. However, at the moment, due to a small oversight, there are legacy systems in code that require old prefab-based setup to be present.
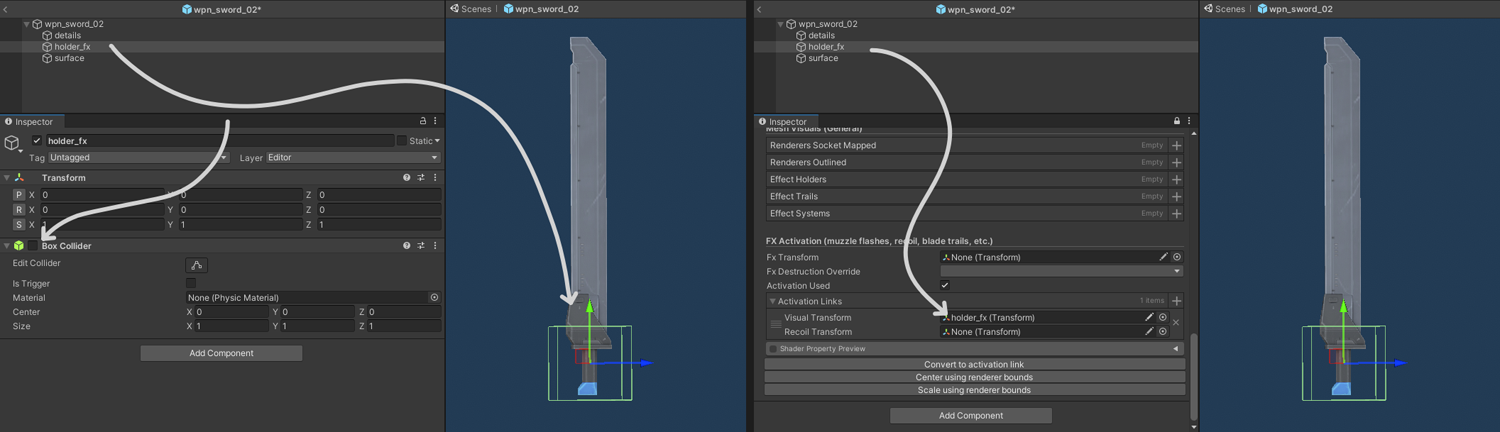
Just add a Transform object to your prefab, add a BoxCollider component to it
Make sure you disable the BoxCollider component
Go to 'Item Visual' component, find 'Activation Links' list, add a new entry to the list
Assign your Transform to 'Visual Transform'
Enable 'Activation Used' bool parameter
Transform placement and BoxCollider parameters won't matter here, but without them, the game will throw an exception when a mech tries to use its melee weapon. This should be fixed later.
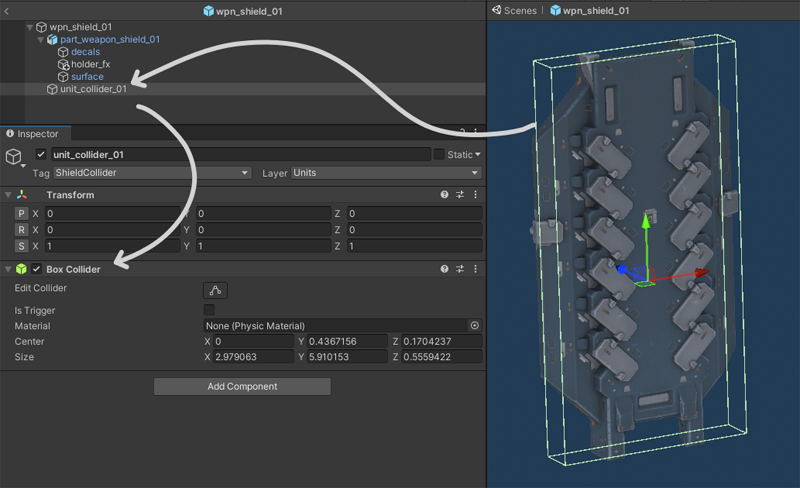
Note: Shields need a BoxCollider component assigned to the whole shield, or to each shield module (if you're making a modular set). So the shield's dimensions will matter if the shield is particularly tall or wide.
Box colliders are necessary to absorb and deflect bullets that hit the shield directly. On top of that, hits elsewhere on the unit will also count as shielded if they land within a 90 degree cone around shield's direction - and this behavior cannot be controlled by the asset itself (and because of this it means you cannot make a tiny shield that won't catch any bullets).
Add an empty transform called 'unit_collider_01'
Add a BoxCollider component to it
Make the collider fit the dimensions of your shield or shield module and keep it enabled
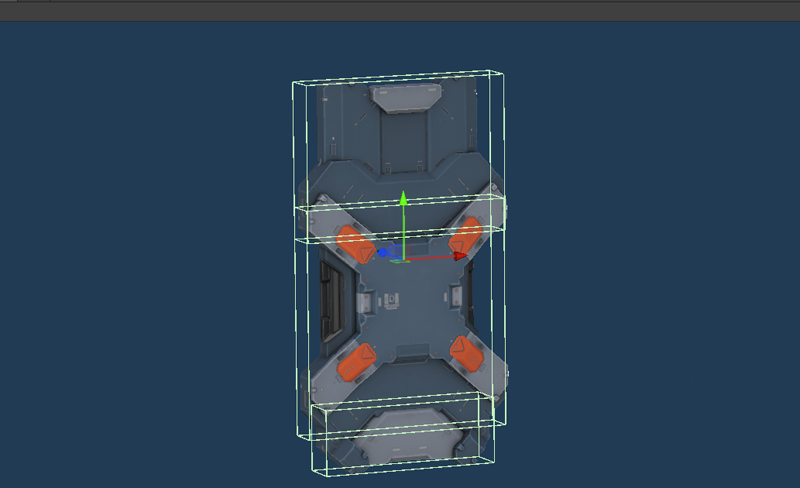
¶An illustration of several shield modules and their BoxColliders
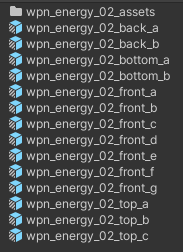
Last, recommended file structure: put all weapon or item prefabs in 'weapon\item-name' folder, with all meshes, textures and materials in a separate assets folder inside the parent folder: