¶ Custom Liveries and You
So you've been playing for a while, and yet you're not satisfied with the livery options. You want something that speaks to you - maybe a pure black rig with white and orange highlights, or royal purple trimmed with gold. Lucky for you, modding in your own liveries is actually pretty simple.
To start, you'll need to locate the game's install directory. From there, open the Configs folder, then DataDecomposed, then Equipment, then Liveries. You should be presented with a list of YAML files. To edit these, you'll want a text editor like Notepad++, as YAML is very touchy about correct indentation. Now that you've got the files and your tools set up, it's time to take a look at one of the files - we'll use the ‘default' grey ‘livery’ as an example;
textName: Default
source: '[aa]Factory'
rating: 1
pattern:
colorPrimary:
  r: 0.4419722
  g: 0.475016
  b: 0.490566
  a: 0
colorSecondary:
  r: 0.5660378
  g: 0.5660378
  b: 0.5660378
  a: 0
colorTertiary:
  r: 0.3490566
  g: 0.322404
  b: 0.2914293
  a: 0
materialPrimary: &o0
  x: 0
  y: 0.5
  z: 0.8
  w: 0
materialSecondary: *o0
materialTertiary: *o0
From the top; the textName and source are displayed in the livery selection list, along with the rating (aka rarity). The pattern is currently unused, but will likely be used to apply textures to liveries in future updates.
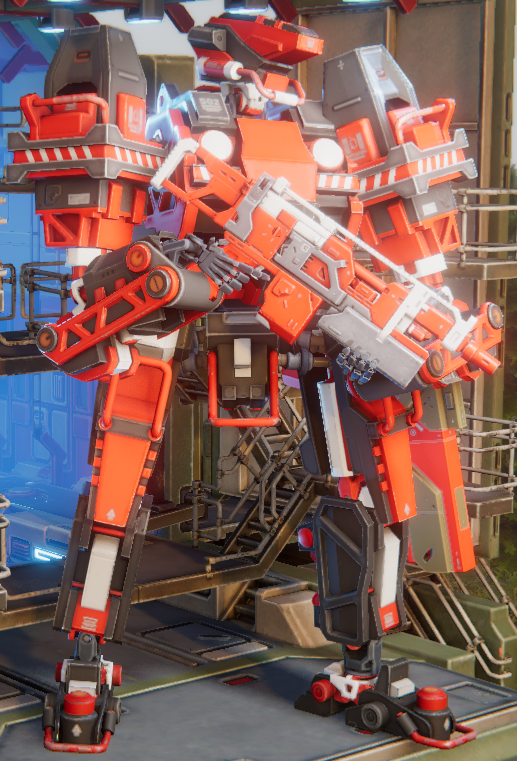
The three color and material blocks are the meat of the livery itself; the color blocks indicate the red, green, and blue intensity, along with the alpha level of the texture applied (currently non-functional) to a set of parts on given mech component. The material blocks determine the smoothness remapping (x/y/z) and metalness (w) of the part's greyscale material map itself (more on that later). All values are on a 0-1 scale, though the ‘metalness’ is best treated as a binary 0-or-1 rather than a sliding scale; for this value, 0 is more like plastic or paint, whilst 1 is exposed metal. The image to the right shows an example of how the parts are broken down into groups using red, black, and white as the primary, secondary, and tertiary colors respectively.
Let's say you want to make a livery in which purple is the predominant surface color. First, make a copy of an existing livery file with a unique filename, and change the textName/source to whatever you like; it's a good idea to make this clear/distinctive so you can pick out your livery from the list by more than just the color swatch. Files are loaded in alphabetical order of filename, rather than livery name.
Now for the livery itself, you'll need the RGB values for purple; with a straight purple that's 128/0/128. Convert this over to the 0-1 scale by dividing 128 by 255 to give ≈0.5. Your colorPrimary should now look like this;
colorPrimary:
  r: 0.5
  g: 0
  b: 0.5
a: 0Save your changes and launch the game. When you next load into the mech bay, you should see your livery amongst those in the selection menu. With any luck, any mech you equip it on should turn (mostly) purple!
Now what if you want the purple to be metallic and shiny, and without making the other parts metallic? That's harder, but not too tricky. Scroll on down to the material section of the file. The “&o0” and “*o0" are shorthand for “copy this section from here" and “paste the copied section to here” respectively, so if you don't want the detail to be metallic then you'll need to remove those and copy the x/y/z/w values across to the Secondary and Tertiary blocks, so the whole thing looks more like the color section. Once that's done, it should look like this;
materialPrimary:
  x: 0
  y: 0.5
  z: 0.8
  w: 0
materialSecondary:
  x: 0
  y: 0.5
  z: 0.8
  w: 0
materialTertiary:
  x: 0
  y: 0.5
  z: 0.8
w: 0The x/y/z values refer to the remapping of smoothness map mentioned earlier. Most mech parts start with a full range smoothness texture, where darkest crevices have smoothness of 0 (no specular reflections, totally matte) and brightest, most polished edges have smoothness approaching 1 (mirror-like). The x/y/z values of the material can compress and shift this map. If you don't care about smoothness of the material, a good baseline for these values is around 0/0.4/0.8 (for a semi-smooth clean look). However, it is useful for achieving specific effects: for instance, using values of 0/0.2/0.5 can result in a very matte livery that looks like coating of a stealth aircraft (maximum smoothness drops to 0.5 instead of 1.0 and average smoothness drops to 0.2 instead of 0.5)
With that out of the way, set the materialPrimary w value to 1. When you next fire up the game, your purple sections should be all shiny and metallic, but the rest should be relatively matte.
The best thing you can do from here is just tinker; keep a backup of the file, and see what you can make. Use color lookup services or palettes to find the RGB values of colors you want, convert them across, and tweak the values until you get something that looks good to you. Just keep in mind that the appearance of a livery will vary wildly based on lighting conditions, especially when using smooth, metallic materials. Expecting a chromed-out mech to always look shiny and silver won't really work for instance, as it'll reflect a lot of environmental light.
Once you're satisfied, you can share screenshots and even the livery file itself with the community via the Discord and forums.
¶ Wait, “Metalness”? What's that?
To put it simply, the w value of a material defines whether light striking the material behaves like it's paint/plastic, or like it's metal. In the former case, the material will absorb most of the incoming light, which will bounce around inside the surface layers of the material and reflect back unchanged. In the latter, the light reflects straight off.
Ultimately you'll have to experiment with the material x/y/z/w values to get the end result you want.